Hot Cross Buns

Hot Cross Buns | Bácáil with Love (Bake with Love)

Hot Cross Buns | Bácáil with Love (Bake with Love)

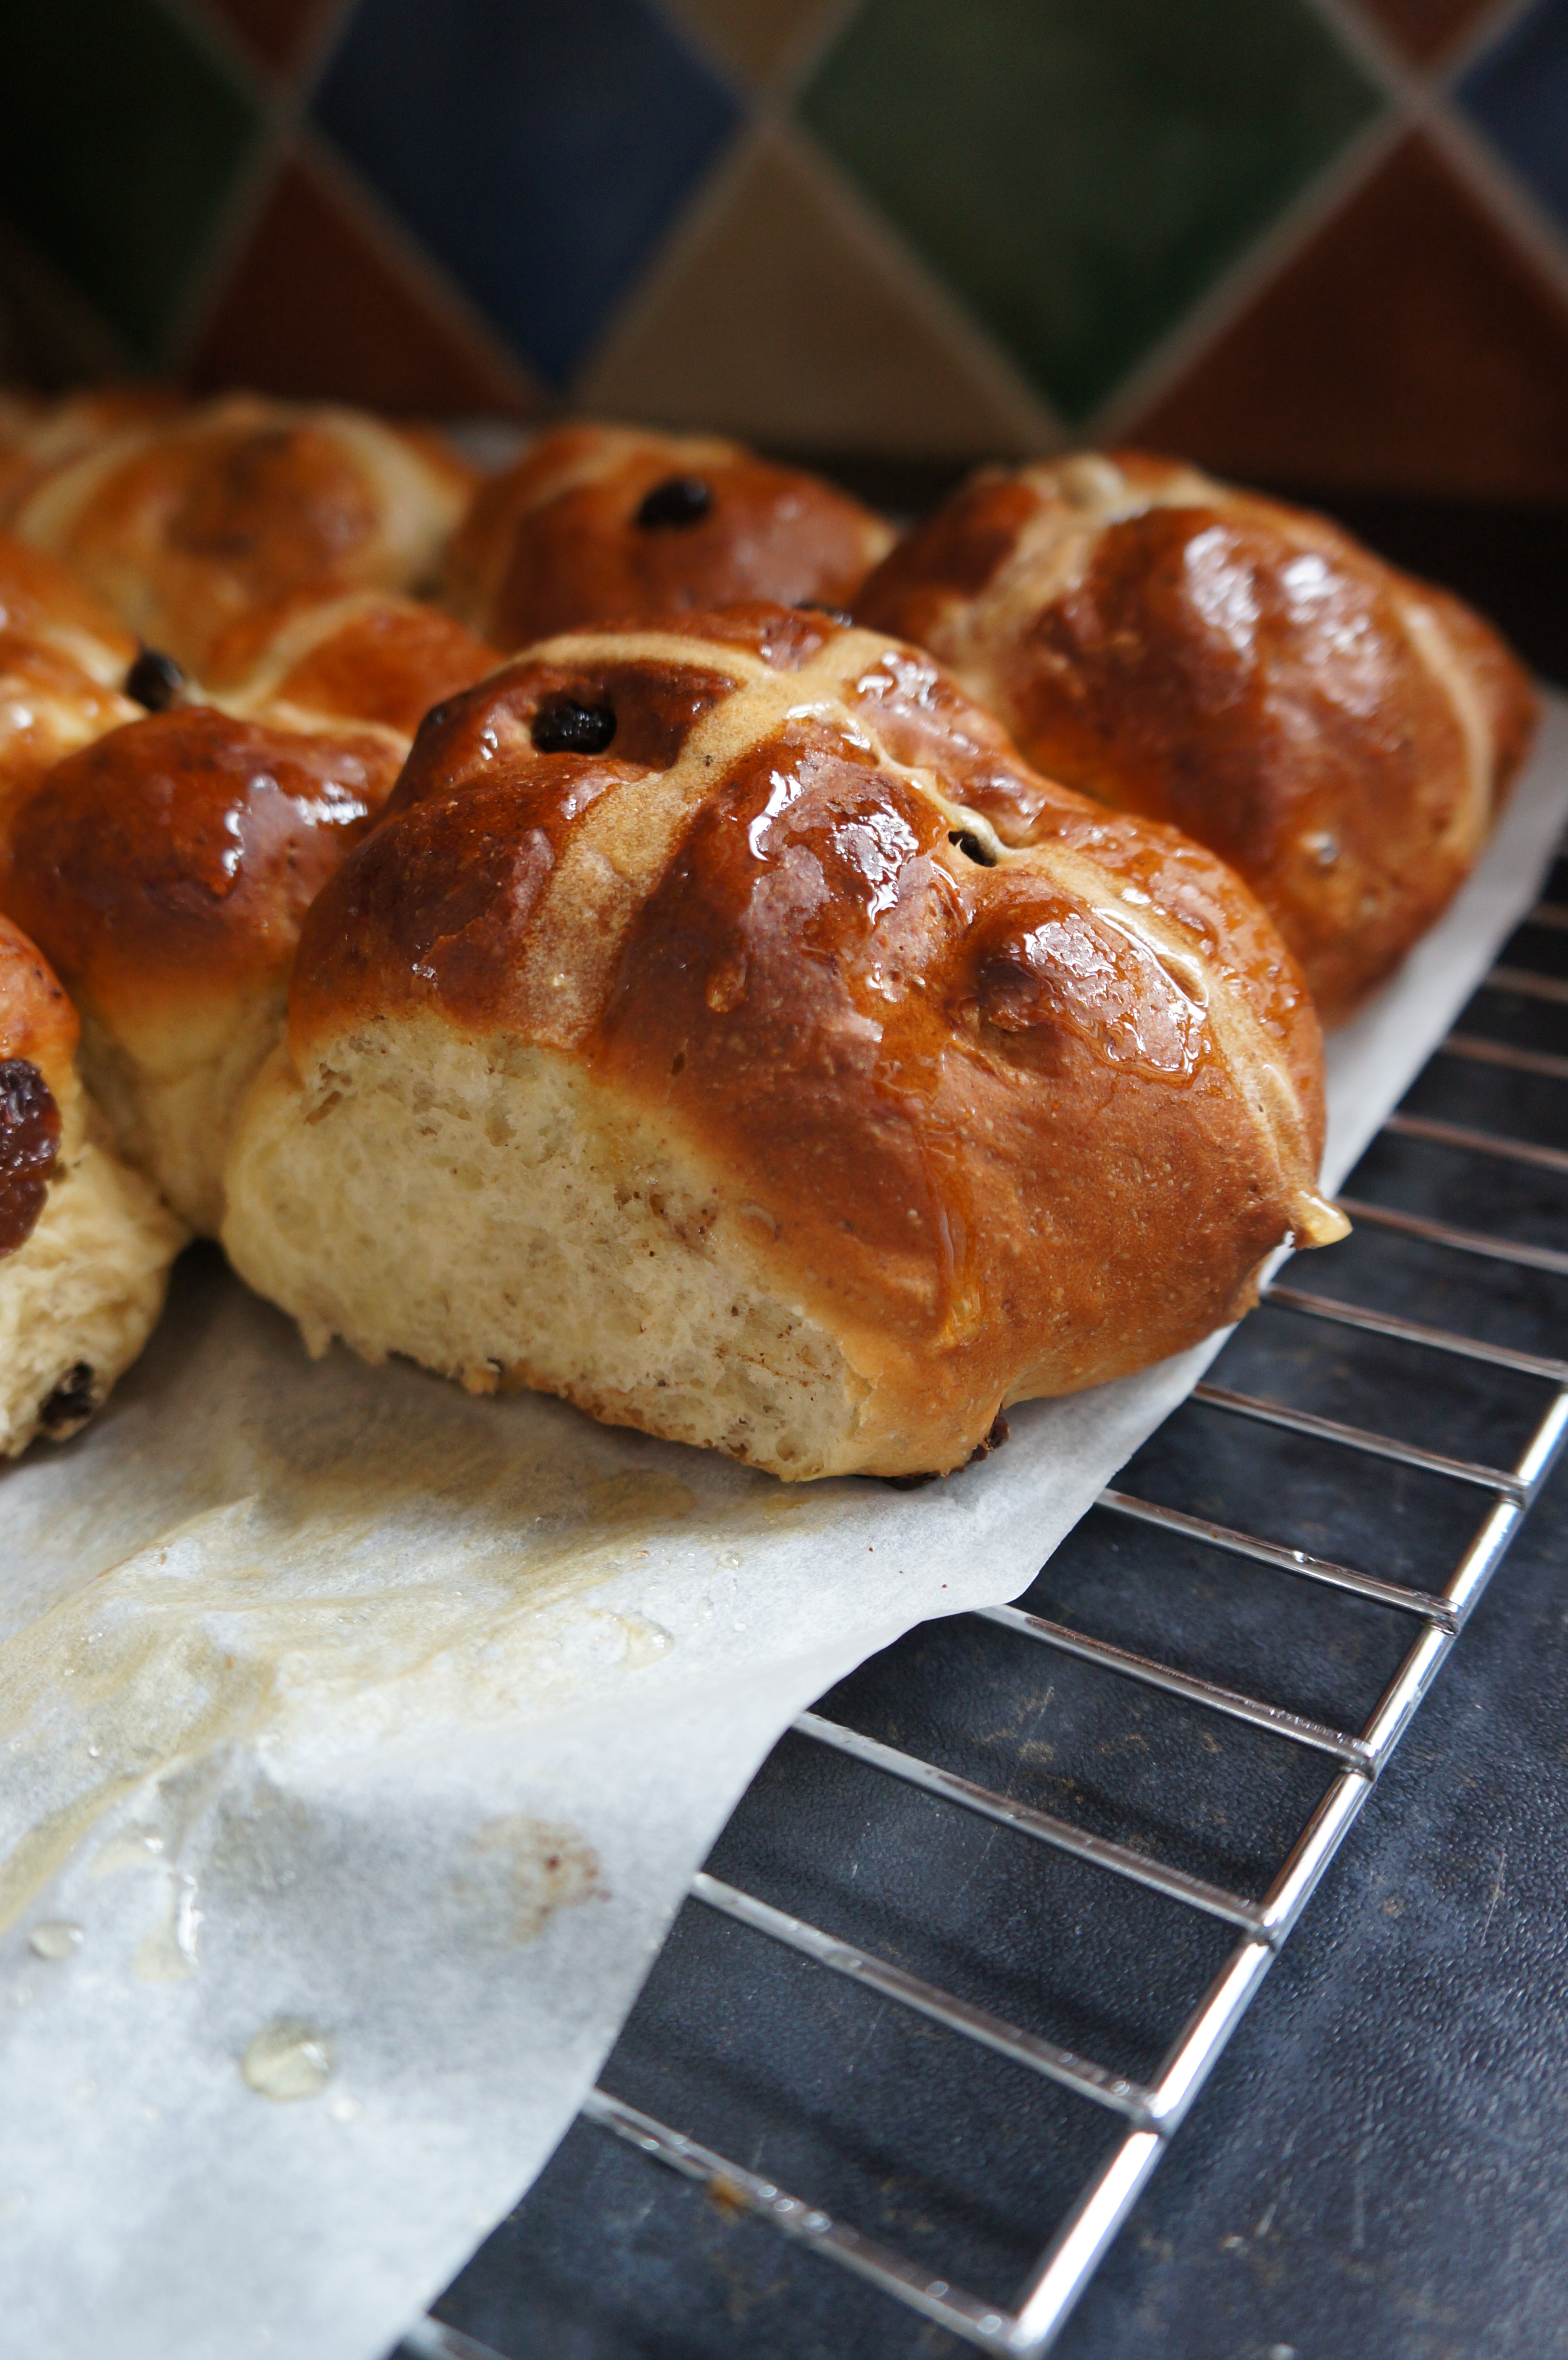
I do love a hot cross bun. I’m certainly not against the supermarkets variety but I do love making my own at Easter time. Nothing tastes as good as freshly baked goods. I’ve tried lots of recipes and this one adapted from a few recipes I have gathered over the years. There are a lot of stages to this recipe, but believe me it is so worth it the end! The smell of freshly baked hot cross bums is simply divine.

Hot cross buns

Makes 16

  • 500g strong white flour
  • 10g fast action yeast
  • 10g salt
  • 75g sugar
  • 120ml warm milk
  • 120ml cool water
  • 2 medium eggs, beaten
  • 40g soft unsalted butter
  • Finely grated zest of two oranges
  • 1 teaspoon of mixed spice
  • 150g sultans
  • 150g currants

For the Crosses

  • 25g Flour
  • 50ml water

For the glaze

  • Warmed orange marmalade or warmed golden syrup.

Method

  1. Place the flour, salt, sugar, mixed spice and yeast to the bowl, making sure the salt and yeast are at separate sides of the bowl. Add the warm milk, soft butter, eggs and half the water. Mix the ingredients together until you have a soft dough. If it is too dry, add the remaining water slowly until you have a soft, but not soggy, dough. Knead for 5 mins in a mixer or 10 minutes by hand or until the dough is very smooth and bouncy.
  2. Place the dough in a lightly oiled bowl, cover and leave to prove in a warmish place for 1-2 hours or until the dough is doubled in size.
  3. Once the dough is ready, turn out onto a lightly floured work surface. Lightly flatten it out a little and tip the orange zest, dried fruit on top. Gently work them into the dough until they are all evenly incorporated.
  4. Place this fruity dough back into the bowl and leave for one hour to prove until risen in size again.
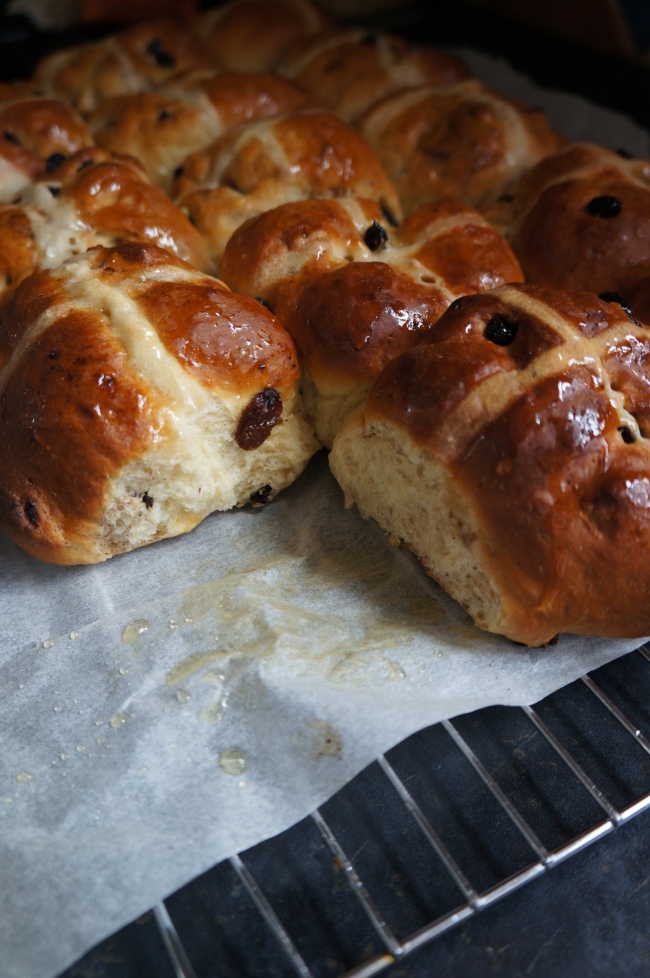
  5. Divide the dough into twelve equal portions. I weighed mine to 75g each. Roll each piece of dough into balls and place fairly close together on a baking tray lined with baking paper. Cover and leave to prove for one hour until well risen and at least doubled in size.
  6. For the crosses, mix 25g plain flour and 30-50ml water together until you have a smooth paste that isn’t too runny. Using a piping bag fitted with a small nozzle, pipe crosses on the buns. It’s easier to pipe the crosses onto the buns in one long line so you get a smooth result.
  7. Bake for 20 minutes or until golden brown. Remove the buns from the oven, then brush with the orange marmalade glaze while hot. Cool on wire racks.

If dried sultans and currants are not to your taste you can swap them for cranberries and white chocolate or with any other dried fruit of your choice.
Happy baking,

Bácáil with Love (Bake with Love)

Hot Cross Buns | Bácáil with Love (Bake with Love)

Hot Cross Buns | Bácáil with Love (Bake with Love)

Victoria Sponge Cake

Some might be fancier, other might be flashier, but no cake beats the simplicity of a Victoria Sponge! Its a firm favourite in our house, making a regular appearance as it is super easy to whip up and I always have the ingredients at hand.

DSC04785

The jam filling changes depending on the time of year, from plum jam to blackberry jam in summer time. Whatever takes your fancy really!

Ingredients

  • 225g margarine
  • 225g caster sugar
  • 4 free-range eggs
  • 225g self-raising flour
  • 2 tsp baking powder
To serve
  • good-quality strawberry or raspberry jam
  • whipped double cream

Preparation method

    1. Preheat the oven to 180C. Grease and line 2 x 20cm/8in sandwich tins with parchment paper.
    2. Cream the butter and sugar together until light fluffy. Then add the eggs one at a time into the butter and sugar mixture.
    3. Then add the sieved flour and baking powder . Mix everything together until well combined.
    4. Divide the mixture evenly between the tins, use a spatula to remove all of the mixture from the bowl and gently smooth the surface of the cakes.
    5. Place the tins on the middle shelf of the oven and bake for 25 minutes. The cakes are done when they’re golden-brown and coming away from the edge of the tins. Press them gently to check – they should be springy to the touch. Remove them from the oven and set aside to cool in their tins for five minutes. Then run a palette or rounded butter knife around the inside edge of the tin and carefully turn the cakes out onto a cooling rack. Set aside to cool completely.
    6. To assemble the cake, place one cake upside down onto a plate and spread it with plenty of jam and then spread over whipped cream.
    7. Top with the second cake, top-side up. Sprinkle icing sugar over the top.
Happy baking,


Bácáil with Love (Bake with Love)

DSC04783

Carrot Cake

Carrot Cake | Bacail with Love

Carrot Cake reminds me of my first job out of school. Most days on our 11am break we would pop around to the local bakery and pick up goodies! The bakery has closed for business some time now. They had the most amazing bakes, from coffee cake to apple turnovers. But the carrot cake was by far my favourite. I didn’t feel guilty eating it as after all it is one of your five a day after all 😉

Carrot Cake | Bacail with Love

I have tried many recipes to replicate that carrot cake and this one matches all my memories. It deliciously moist, has the just the right amount of spice. The orange in the icing marry all the flavours to make one moreish mouthful! And an extra bonus is that it is super easy to make.

Ingredients

  • 2 eggs
  • 150 ml sunflower or vegetable oil
  • 200 g soft light brown sugar
  • 300 g peeled and grated carrots (weight when grated)
  • 75 g walnuts, chopped (optional)
  • 175 g self-raising flour
  • 1⁄2 tsp bicarbonate of soda
  • 1 tsp ground cinnamon
  • 1 tsp mixed spice
  • pinch of salt

For the icing

  • 50g Softened unsalted butter
  • 125g full fat cream cheese
  • 300g Icing Sugar
  • finely grated zest of 1 orange

Carrot Cake | Bacail with Love

Method

  1. Preheat the oven to 150°C, grease and line the base of two 8 inch cake tins with baking parchment.
  2. Whisk the eggs in a large bowl to break them up, then whisk in the oil, sugar, grated carrots and chopped nuts.
  3. Sift in the remaining ingredients and bring the mixture together using a spoon.
  4. Divide the mixture between the prepared tins, smoothing the surface with a palette knife, and bake in the oven for between 45 minutes or until a skewer inserted into the centre of the cake comes out clean.
  5. Allow to cool in the tin for about 5 minutes, then carefully lift the cake out of the tin and place on a wire rack to cool down fully before you ice it.
  6. While the cake is cooling, make the icing. Beat all the ingredients together, then use a palette knife to spread evenly over the cake.

Happy baking,

Bácáil with Love (Bake with Love)

Carrot Cake | Bacail with Love

Chocolate Guinness Cake

Valentine day eve and I am finally sitting down with a cup of peppermint tea. What a busy week we have had! My daughter caught the chickenpox last Thursday so we have spent the week tied up at home nursing her back to health.

I love valentines day, actually I don’t think there is a holiday I don’t like 🙂 one day of the year we take out of our busy lives to show that loved one how much we love them. And there is always is a delicious meal involved!

My valentines baking this year is a Chocolate Guinness Cake. A friend gave me this recipe after baking it for me when I came home from hospital with my new born daughter. I fell in love with its dense chocolatey flavour and light cream cheese frosting. The Guinness enriches the chocolate flavour without giving a stout taste. The recipe calls for baking just one layer of cake but I prefer dividing the mixture between two 9″ baking tins an sandwiching the layers with the frosting, that way you get a more even ratio of cake to frosting!

Chocolate Guinness Cake | Bácáil with Love (Bake with Love)

Chocolate Guinness Cake

For the Cake

  • 250ml Guinness
  • 250g unsalted butter
  • 80g Cocoa powder
  • 400g Caster sugar
  • 2 eggs
  • 1 tsp Vanilla extract
  • 140ml Buttermilk
  • 280g Plain Flour
  • 2tsp Bicarbonate of Soda
  • ½ tsp Baking Powder

For the Frosting

  • 50g Softened unsalted butter
  • 125g full fat cream cheese
  • 300g Icing Sugar
  • Cocoa Powder for dusting.

Method

  1. Grease and line the base of two 9 inch cake tins.
  2. Preheat the oven to 170C .
  3. Pour the Guinness into a saucepan and then add the butter and heat gently until the butter has melted. Remove from the heat and add the cocoa powder and sugar into the warm mixture.
  4. In a bowl, mix the buttermilk, vanilla essence, and eggs together. Add this to the mixture in the saucepan.
  5. Sift the flour, baking powder and bicarbonate of soda into a mixer or hand held whisk. Mix on a low speed and add the mixture from the pan. Mix thoroughly until all of the ingredients are incorporated.
  6. Pour the mixture into the cake tin and bake for approx 30 minutes.
  7. The cake will be baked when the sponge bounces back when pressed lightly and a skewer inserted in the middle of the cake comes out clean.
  8. Let the cake cool down, remove from the tin onto a wire rack and set aside until it has completely cooled down before adding any frosting.
  9. To make the frosting, using a mixer or hand held whisk, mix the butter and icing sugar together until it is fully combined and smooth. Add the cream cheese and mix on a medium speed until light and fluffy.
  10. Once cooled place one of the cake layers on a serving plate and cover with half the frosting, place the second layer on top and spread the remaining frosting on top.

Happy baking,

Bácáil with Love (Bake with Love)

DSC04827

Lemon Drizzle Cake

January, I can almost see the end of you! Last week my little daughter caught a virus that left her feeling very poorly 😦 She broke out in a rash and was totally off form and not eating. It was a long week with lots of sleepless nights but thankfully she’s 100% now and back to her bubbly chatty self 🙂

Our weekly trips of play dates in friends houses and to the toddler groups were called off and cabin fever had well and truly set in by the weekend!

I love play dates, we get to go to a friend’s house and be lavished with copious cups of tea and indulged in a selection of baked goods.  Heaven! We all contribute, some cheat and just buy something, but if gives me an opportunity to have my recipes tested.  

With all that went on last week I needed something quick, I needed something simple, I needed a lemon drizzle cake.  


Lemon Drizzle Cake | Bácáil with Love (Bake with Love)

You simply mix all the ingredients, bake the cake then poke holes in it and pour over a lemon and sugar syrup to soak in as it cools in the tin.

It is a wonderfully moist and fragrant cake, and its a cake that can by made in a hurry with minimal fuss and attention and it cuts wonderfully. It was demolished by all Mums and toddlers. 

Lemon Drizzle Cake | Bácáil with Love (Bake with Love)

Ingredients

  • 225g unsalted butter, softened
  • 225g caster sugar
  • 4 eggs
  • finely grated zest 1 lemon
  • 225g self-raising flour
  • Teaspoon of Baking powder
  • Tablespoon of milk

Drizzle Topping

  • juice 1 lemon
  • 120g caster sugar

Method

  1. Heat oven to 180C. Grease and line a 9in x 12in rectangle baking tray with parchement paper.
  2. Beat together the butter and  the caster sugar until pale and creamy, then add 4 eggs, one at a time, slowly mixing through. Sift in the flour, then add the finely grated zest of 1 lemon and mix until well combined. Spoon in the mixture and level the top with a spoon.
  3. Bake for 40 mins until a thin skewer inserted into the centre of the cake comes out clean.
  4. While the cake is cooling in its tin, mix together the juice of 1 lemon and caster sugar to make the drizzle. Prick the warm cake all over with a skewer or fork, then pour over the drizzle – the juice will sink in and the sugar will form a lovely, crisp topping. Leave in the tin until completely cool, then remove and serve. Will keep in an airtight container for 3-4 days.

Happy baking,

Bácáil with Love (Bake with Love)

Lemon Drizzle Cake | Bácáil with Love (Bake with Love)

Ginger and Treacle Traybake with Orange Icing

January is in full swing now and 2014 has not had the best start for us, with the lost of my dear Grandmother one week ago today. She had been diagnosed with terminal cancer last year but her condition had suddenly deteriorated so quickly in recent weeks.

Yet it seems that she has gone too soon. I will remember my Grandmother as someone who was brimming with life, laughter and generosity. I am so grateful that she got to meet my daughter. But I know she will be watching over all of her children, grandchildren and great-grandchildren.

I have not been in the kitchen baking this year and how I miss it, I find it so relaxing and comforting! And comfort is exactly what I need at the moment, and these ginger and treacle squares will do just that! They are packed full of flavour, a deep warming flavour with all the spices, ginger and treacle. They are like gingerbread men in a cake The orange icing gives the spices and extra lift , they are the ultimate comfort food perfect with a cup of tea.

 Ginger & Treacle Traybake | Bácáil with Love (Bake with Love)

Ingredients

  • 225g margarine, softened
  • 175g light muscovado sugar
  • 200g black treacle
  • 300g self-raising flour
  • 2 tsp baking powder
  • 1 tsp ground mixed spice
  • 1 tsp ground allspice
  • 1 tsp groung ginger
  • 4 free-range eggs
  • 4 tbsp milk

For the icing

  • 150g icing sugar, sieved
  • Juice from one orange

Preparation method

  1. Grease and then line a 12 x 9 in rectangle baking tin with the parchment paper.
  2. Preheat the oven to 160C.
  3. Measure all the ingredients for the traybake into a large bowl and beat well for about two minutes until well blended.
  4. Turn the mixture into the prepared tin,  and level the top gently with the back of the spatula.
  5. Bake in the preheated oven for about 35-40 minutes, or until the traybake springs back when pressed lightly with a finger in the centre and is beginning to shrink away from the sides of the tin. Allow the traybake to cool a little, then remove the cake from the tin by easing the paper away from the sides of the tin. Turn onto a cooling rack, remove the lining paper and leave to cool completely.
  6. To make the icing, mix the icing sugar and juice together in a small bowl until smooth and a spreading consistency. Pour the icing over the cake, spread gently to the edges with a small palette knife.
  7. Allow the icing to set before slicing the traybake to serve.
  8. This cake keeps really well in an airtight tin, and actually improves over the first 2-3 days.

Happy baking,

Bácáil with Love (Bake with Love)

 Ginger & Treacle Traybake | Bácáil with Love (Bake with Love)

Gingerbread Men & Reindeer

Santa is making a visit at my daughters Mother and Toddler group tomorrow. She is only 15 months old so there is not much excitement about it for her but I am a little, rekindling my childhood spirit a bit 😉

There will be a little party for the kiddies with goodies, music and games. This gives me an opportunity to bake my gingerbread men in army quantities 🙂

DSC04483

These gingerbread men are deliciously gingery and the treacle gives them a depth of flavour, really brings out the spices.

DSC04443

Ingredients

For the cake:

  • 400g plain flour
  • ¾ tsp bicarbonate of soda
  • 2tsp ground ginger
  • 2tsp ground cinnamon
  • ½ tsp ground allspice
  • ¼ tsp ground nutmeg
  • ½ tsp salt
  • 180g unsalted butter, at room temperature
  • 125g soft dark brown sugar or dark muscovado sugar
  • 1 egg
  • 125g black treacle

For the royal icing:

  • 1 egg white
  • ½ tsp freshly squeezed lemon juice
  • 310g icing sugar, sifted
  • food colouring, optional
  • gingerbread biscuit cutters
  • a baking tray, lined with greaseproof paper
  • Milk Chocolate, melted if making the Reindeer

Method

For the cake:

  1. Sift together the flour, bicarbonate of soda, ginger, cinnamon, allspice, nutmeg and salt in a large bowl and set aside.
  2. Put the butter and sugars in a free standing electric mixer with a paddle attachment (or use a handheld electric whisk) and cream on slow speed until light and fluffy. Turn the mixer up to medium speed and beat in the egg and treacle, scraping the sides of the bowl with a rubber spatula to get any unmixed ingredients from the side of the bowl.
  3. Turn the mixer back down to slow speed and slowly add the flour mixture a couple of tablespoons at a time, stopping often to scrape any unmixed ingredients from the side of the bowl with a rubber spatula. Once a dough has formed, take it out of the mixer, divide into 3 and wrap each piece in clingfilm.
  4. Leave to rest overnight in the fridge.
  5. When you are ready to bake the cookies, preheat the oven to 170°C.
  6. Take the dough out of the fridge and leave to soften for about 10 minutes. Lightly dust a clean work surface with flour and roll out the dough to a thickness of about 4 mm with a rolling pin. Cut out shapes with the biscuit cutters. Arrange the cookies on the prepared baking trays and bake in the preheated oven for about 10–15 minutes.
  7. Leave the cookies to cool slightly on the trays before turning out onto a wire cooling rack to cool completely.

DSC04444

For the royal icing:

  1. Beat the egg white and lemon juice together in a free standing electric mixer with a paddle attachment (or use a handheld electric whisk). Gradually start adding the icing sugar, mixing well after each addition to ensure all sugar is incorporated. Whisk until you get stiff peaks. If the icing is too runny, add a little more sugar. Stir in a couple of drops of food colouring, if using, and decorate the cookies.

DSC04481

Pipe the melted chocolate on to the gingerbread men upside down in the shape of a reindeer, using a smartie chocolate sweet for decoration for his nose and pipe two eyes with royal icing.

DSC04480

Merry Christmas & Happy baking,

Bácáil with Love (Bake with Love)

Christmas Mince Pies

Christmas Mince Pies | Bácáil with Love (Bake with Love)

Christmas is in full spirit now, only 10 sleeps left, we are getting excited with the arrival of Santa. We put up the tree during in if my daughters naps, so when she awoke the house was transformed into a Christmas wonderland. She was amazed with the tree standing in the sitting room and all the lights sparkling. She was kept pointing and all the ornaments and saying wow, adorable. And to our amazement she hasn’t felt the need to redecorate the tree yet 😉

These days, I try to make my own mincemeat and use this to either make small individual mince pies or even a larger individual pie. I love mince pies, to me they are the flavour of Christmas!

I am not the world’s biggest fan of candied fruit or glacé cherries, and suet is not an ingredient that has ever made its way into my kitchen. Altering the ingredients slightly not only allows you to use your favourite dried fruit and spices but it also lets you nudge the mince pies ever so slightly to your own flavour.

Mince Meat Recipe here

Christmas Mince Pies | Bácáil with Love (Bake with Love)

For the pastry
Ingredients
  • 375g plain flour
  • 250g  butter, softened
  • 125g caster sugar
  • 1 medium free-range egg

Method 

  1. Preheat the oven to 200C
  2. To make the sweet pastry, rub the flour, butter, sugar and egg together with a splash of cold water until it just comes together as a dough. Do not over work the dough. Wrap the pastry in cling film and set aside to chill in the fridge for an hour.
  3. Roll out the pastry to a 3mm/1/8in thickness. With a round pastry cutter, cut out 6 x 9cm/3½in discs of pastry. Press the pastry into the muffin cups and fill each one with a good helping of the mincemeat mixture, so that it reaches three-quarters of the way up the side of the pastry-lined cup.
  4. With a fluted or star pastry cutter, cut out 6 x 8cm/3¼ in pastry shapes for the lids. Place a lid on top of each pie and gently push down. 
  5. Bake for 20 minutes, then transfer to a wire rack to cool. Dust with icing sugar and serve warm with fresh cream.

Merry Christmas & Happy baking,

Bácáil with Love (Bake with Love)

Christmas Mincemeat

Christmas Mincemeat | Bácáil with Love (Bake with Love)

Christmas is only around the corner and its time to dig out the Christmas decorations. We usually have our decorations up as early as we can to make the most out of it. However we are debating this year on when to put up the Christmas Tree as this year we have a very busy toddler who is into EVERYTHING.

Mince Pies are an essential part of Christmas for me, I think they are the flavour of Christmas!  The first time I tried a mince pie, still warm from the oven and dusted with a thin layer of icing sugar, I was sold. There is something incredibly comforting about biting into a warm mince pie, the heavenly smell of the warming spices hitting you first and the way the delicate pastry shell gives way to the sweet and spicy filling of cooked apples and tangerines, as well as candied fruit peel, the flavour of the filling varying slightly every time, depending on the cook’s preferences.

Christmas Mincemeat | Bácáil with Love (Bake with Love)

Ingredients

  • 175g Light Muscavado Sugar
  • 175g Sultanas
  • 125g Raisins
  • 125g Currants
  • 125g Candied Peel
  • 25g Chopped Nuts
  • 1 Teaspoon Mixed Spice
  • Level Teaspoon Cinnamon
  • Good Pinch Nutmeg
  • 225g Bramley Apples -grated
  • 3 Tangerines – zest grated and juiced
  • 125g Butter – melted
  • 3 Tablespoons of Orange Juice
  • Or 3 Tablespoons Brandy, Rum or Whiskey

Method

  1. Put the first nine ingredients into a large bowl and mix well.
  2. Next, add the grated apple, melted butter and juice or alcohol. Stir well to combine.
  3. Cover and allow to ‘stand’ overnight.
  4. Stir well again, then, transfer to sterilized jars. Cover with wax discs and seal the lids with jam pot covers or store in preserving/kilner jars.
  5. Store in a cool dark place.

Happy baking,

Bácáil with Love (Bake with Love)

Christmas Mincemeat | Bácáil with Love (Bake with Love)

Raspberry and White Chocolate Blondies

With Autumn setting in, the temperature changed dramatically this week. The central heating had to be turned on full blast and all the winter hats and coats are out! Saying that I love autumn, the sound of rustling leaves on the pavement as the trees shed their leaves. The colours of the trees are so warming in orange and red, it is so picturesque! I love the cool crisp air too, time to wrap up well and get out for a walk!

With the temperatures changing I always get peckish for something to warm me up. Love a baked treat and a cup of tea in front of the fire. Laying down fuel for the cold winter 😉

This recipe is so quick and easy to bake, and the result is amazing! The sharpness of the raspberries is met beautifully by silky white chocolate, yummy!! I can never wait for them to cool down cutting a slice straight away.

Raspberry and White Chocolate Blondies | Bácáil with Love

Ingredients

  • 200g unsalted butter
  • 150g white chocolate, roughly chopped
  • 300g golden caster sugar
  • 3 large eggs
  • 200g plain flour
  • ¼ tsp salt
  • 1 tsp vanilla extract
  • 125g raspberries

Method

  1. Heat oven to 180C. Butter and line, a shallow rectangular tin, approx 25cm x 22cm.
  2. Melt the butter in a pan, then cook gently for about 5 minutes, until the white solids turn golden and the butter smells biscuity and sweet. Cool for 5 minutes, then add half the white chocolate and set aside for a couple of minutes to melt. Stir until smooth.
  3. Use electric beaters to whisk the sugar and eggs together for about 2 minutes until thick and pale. Tip in the flour, salt, cooled chocolatey butter and vanilla, then fold in with a spatula until even.
  4. Pour the mix into the tin, then scatter with the rest of the chocolate and the raspberries. Bake for 40-45 minutes or until risen all over, with a dark golden crust. Cool completely in the tin, then cut into squares.

Happy baking,

Bácáil with Love (Bake with Love)